
Whether it’s a franchise that has several offices operating around the globe or a startup business with a handful of employees, they can’t do their work without documents. Documentation varies from industry to industry but it exists everywhere. Contracts, budget sheets, internal policies, marketing strategies, project management plans, schedules, work breakdowns. All of these are examples of documents that are critical to getting the work done. Therefore, it’s important to make sure that your team has access to all necessary files and documents at all times. How do you do that?
If you’ve used Microsoft Teams even for just 5 seconds, you would have noticed the Files section in the tab bar of each channel.

It is a default tab that allows users to:
- quickly access all documents,
- share files,
- work collaboratively on documents.
It is not only a great feature for teams who work remotely, but also for those that work from the office. It’s an excellent place to store all project related files. Plus, searching and accessing important documents will no longer be a challenge.
In this article, we will help you understand how you can effectively organize and manage your files and documents in Microsoft Teams.
How are files managed in Microsoft Teams?
Let’s first understand the basics of file management in Microsoft Teams.
Each team on Microsoft Teams is built on a documentation management backbone, SharePoint, which functions as a document library for the team. SharePoint itself is a tool used to save, share, and manage documents.
Note, however, that files shared in chats are stored in each user’s personal OneDrive.
Therefore, the documents that you upload to Microsoft Teams are backed by SharePoint and OneDrive, and they can appear in either one of these places:
1. The Files tab in the channel
2. The Files tab in the chat
There may be overlaps between these two and it’s completely up to you which file you store in which location.
There is no need to download the file, edit it then upload it back to Microsoft Teams. Because most apps that you’re using (e.g., Word, Excel, PowerPoint, etc.) are Microsoft Productivity products, you can edit and comment on them right from the platform and all changes will be saved automatically.
The Files tab in the channel
As already mentioned, the tab is by default there when you create a channel. There are a number of things that you can do within this tab to better organize your files and documents. You can:
- Create a new file (word, excel, power point, etc.)
- Upload existing files and folders from your device
- Sync it with your OneDrive, so all files stored there are visible in Microsoft Teams
- Add cloud storage such as Dropbox, Google Drive, SharePoint, etc.
If you wish, you can open and manage your documents from SharePoint by selecting Open in SharePoint from the bar below the tabs. Another helpful feature available to you is the Copy link. If you need to share all the files stored in that particular channel, you do it via a generated link.
Adding individual files as tabs
Sometimes, locating a specific file that requires the contribution of multiple members of the team from the document library can be challenging. Luckily, there is an efficient way of doing so.
If a certain document needs to be more visible and easier to access so that the team members can actively add comments and review, you can add that particular file as a tab within the channel. This feature is accessible to any file located in the Files tab. The document becomes front-and-center once it is a tab, and all team members can find and work on it easily. Once the file is revised and approved, or is simply no longer relevant, you can remove it from the tabs bar, and the document will still remain in the Files tab.
To add a file as a tab, go to the channel where the collaborative document is located. If the file isn’t located anywhere on Microsoft Teams, upload it to the channel first. Click on the file and from the upper menu, select Make this a tab.

It will appear in the tab bar immediately.
Another way to add a file as a tab is by going to the channel where you wish to add it, click +Add a tab, select the app that represents the file’s format (Word, Excel, PowerPoint or others), and then choose your file location.

The Files tab in the chat
The next place where you can store, manage, and organize your files is in chats. Even though all members of the channel can find the documents in the Files tab, sometimes, there might be documents that you need to share with a specific colleague but it’s not an important file and doesn’t need to be uploaded to Files. In such cases, you can send them via the chat and for your convenience, all these files are compiled into a Files tab within the chat.

Similar to channel Files, chats also allow you to pin any document to the tab bar. To do so click on the +Add a tab icon, and from the app menu select what you’d like to pin.
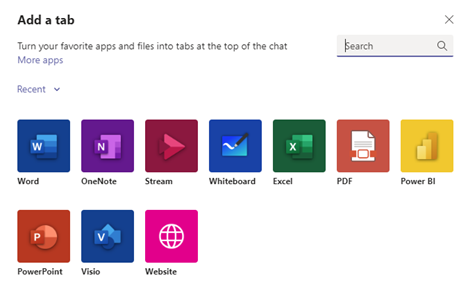
Keep in mind that instead of being presented with the files, you will see the apps such as Word, OneNote, Excel, pdf, etc. Choose the relevant app and it will show you all files in that format that you can pin as a tab.
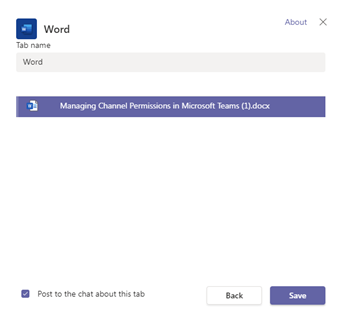
When you’re done, click Save and the file will appear in the tabs.

The advantages of having files as tabs
Having documents as tabs comes with many benefits. The first advantage is the most obvious one and we’ve talked about it a lot throughout the article. When you pin files as tabs, they become easier to access, as they are right on top of the page, alongside the remaining significant tabs that you use during day-to-day operations. It saves valuable time, which you could otherwise spend on searches in a vast document library containing many files.
Another huge advantage that tabs pose is the enhanced visibility of certain documents, which require additional attention. Maybe it’s a template that you want everyone to use, or corporate guidelines that should always be at hand. When you pin certain files to the tab bar, they are always within eyesight and serve as constant reminders.
The bottom line is, having files on the tabs bar can improve productivity and efficiency in daily performance and collaboration.
Managing and organizing files through Microsoft Teams templates
Microsoft Teams makes collaboration easier, and templates allow to use Microsoft Teamsin a more efficient way, so using both, you get a win-win. Templates are beneficial as they offer multiple capabilities, including established settings, existing channels, applications, tabs, and more. The features gained from templates vary based on the solution that you choose. It could be native Teams templates or third-party solutions such as SalesTim.
SalesTim templates will provide you with pre-configured tabs including Files. So, you don’t have to do it manually for each and every team. Here is the greatest part of all, if there are common files that you want each of your teams to have – simply add them to the template. When you create new teams from that template, those files will automatically appear in the channels.
How to a create a Microsoft Teams template with files
Follow these simple steps, and you will have a working template with all the necessary files in no time:
Step 1 Create the original team
Go to Microsoft Teams and create a team, based on which the template will be developed. For example, you can create a team called “Onboarding – Template” and add all relevant channels such as Our Company, Meetings and Events, Training, Security, Team, etc.

Step 2 Create folders and upload all necessary files
The Files tab will be there by default. You can go through channels to create folders and add files that you think all other teams should have.

Step 3 Pin certain files to tabs
This one is not a mandatory step. If you want to give extra visibility or accessibility to certain files, pin them as tabs and if not, skip this step.

Step 4 Create the template
Open the SalesTim app, click on +New template and select the template that you’d like to clone – in this case “Onboarding – Template.” You will then be asked to configure the governance policies of your template – Naming convention, Approval workflow, Audience targeting and Security policies.

Step 5 Create new teams
Go to Microsoft Teams Home button, click on + New Team and from the newly opened window, select the template i.e. “Onboarding – Template”. You will need to configure the settings and once you do, you’ll have a working team with all files uploaded to the initial team.

You can learn more about the process in detail here.
The benefits that come along with using a collaboration platform that enable document sharing are numerous. For example, increased levels of security, decreasing administrational-related costs, improved project management, and seamless collaboration regardless of the location. All of these are achievable through Microsoft Teams.
Having quick and easy access to all necessary files is crucial to maintain a steady workflow and productivity. Microsoft Team takes care of that by allowing you to share, access, edit and upload files in channels and chats. It provides you with constant access to documents, saves time and allows you to highlight certain files front-and-center and emphasize their significance.